Creating multiyear certificates for use with Citrix

The architecture of a XenDesktop 7.x environment is based upon the use of internal certificates. For internal use, for example for the connection of the StoreFront Server with the Desktop Delivery Controller, one would prefer not be forced to use certificates that need to be changed every year. The standard setting of Microsoft CA for web server certificates is exactly one year. Additionally we will show that a Microsoft CA can be installed using PowerShell.
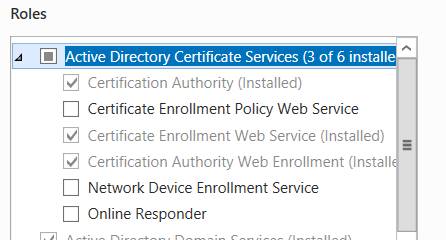
The Microsoft CA can be attached to every Windows server system via Windows rolls. Certificates can be very easily created with the CA that are valid for one year, for example. In accordance with new requirements almost all data paths in terminal server environments today are being encrypted. Thus even communication with the Citrix STA should occur with encryption. Currently the Microsoft CA offers certificates for two years as standard. It is possible however to create one's own template in order to generate longer multiyear certificates. Here we will describe how to achieve this. First the installation of Microsoft CA with PowerShell. A few settings must absolutely be confirmed. This configuration is good for the creation of a quick certificate. This can also be done in a test environment and thereafter the certificates can be imported into the production environment onto only those servers where they are needed. However no CA should be installed for the entire infrastructure of a company in such a manner. A CA for email encryption requires careful planning. The root certificate of the installation will be replicated automatically in Active Directory. It is thus available after some time on all domain members (server/client). It is recommended to keep the validity period of the root shorter, in the event of critical security problems.
add-WindowsFeature Web-Server -IncludeManagementTools
add-WindowsFeature AD-Certificate
add-windowsFeature RSAT-ADCS
Install-AdcsCertificationAuthority -CAType EnterpriseRootCA -HashAlgorithmName SHA256 `
    -ValidityPeriod Years -ValidityPeriodUnits 10 -KeyLength 2048 `
    -CACommonName UranRootCA `
    -DatabaseDirectory c:\CertDB -LogDirectory c:\CertLog  -Confirm:$false
As a result PowerShell provides the following output when the CA was successfully installed:
Certification authority will be installed with the following properties:
CAType:                             EnterpriseRootCA
CACommonName                        UranRootCA
CADistinguishedNameSuffix           DC=uran,DC=local
CADistinguishedName:                CN=UranRootCA,DC=uran,DC=local
IgnoreUnicode:                      False
OverwriteExistingKey:               False
OverwriteExistingCAinDS:            False
ValidityPeriod:                     Years
ValidityPeriodUnits:                10
CryptoProviderName:                 RSA#Microsoft Software Key Storage Provider
HashAlgorithmName:                  SHA256
KeyLength:                          2048
KeyContainerName:
AllowAdministratorInteraction:      False
CertFile:
CertificateID:
OutputCertRequestFile:
DatabaseDirectory:                  c:\CertDB
LogDirectory:                       c:\CertLog
OverwriteExistingDatabase:          False
ParentCA:
Installation of Web Management
Web Management allows for the convenient generation of certificates via a website in a browser. The necessary PowerShell commands follow:
Add-WindowsFeature ADCS-Enroll-Web-Svc
Install-AdcsEnrollmentWebService
Add-WindowsFeature ADCS-Web-Enrollment
Install-AdcsWebEnrollment
Add-WindowsFeature ADCS-Enroll-Web-Svc
Success Restart Needed Exit Code      Feature Result
------- -------------- ---------      --------------
True    No             Success        {Certificate Enrollment Web Service}
Install-AdcsEnrollmentWebService
Enrollment Service will be installed with the following properties:
                    CAConfig:                       SURANDC.uran.local\UranRoot-CA
                    AuthenticationType:             Kerberos
                    ApplicationPoolIdentity:        True
                    ServiceAccountName:
                    RenewalOnly:                    False
                    AllowKeyBasedRenewal:           False
                    SSLCertThumbprint:
                    URL:                            https://surandc.uran.local/UranRoot-
                                               CA_CES_Kerberos/service.svc/CES
Add-WindowsFeature ADCS-Web-Enrollment
Install-AdcsWebEnrollment
The Certification Authority Web Enrollment role will be installed with the following properties:


CAConfig: SURANDC.uran.local\UranRoot-CA
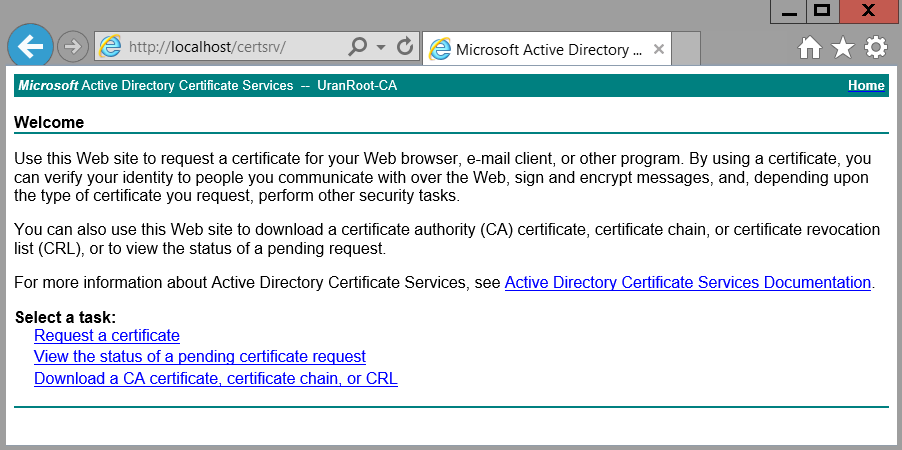
The CA is now on the server itself and can be found at http://localhost/certsrv/ .
Creation of a new template for certificates
Start MMC (mmc.exe) and attach the snap-in “Certificate Templates” via “File; Add/Remove Snap-in”. This template establishes the basis for the certificates that can be created with Microsoft CA. Duplicate the template “Web Server” (right mouse click) and rename it, for example “Webserver 10Years”, if you were to create a certificate that should function for 10 years. In the options under “General” one can choose for how long the certificate will be valid. The option “Renewal Period” establishes when the certificate attempts to renew itself with the CA. A renewal period that is too short leads to increased communication requests with the CA. In this case, we want to export the certificate from an external CA (in the test environment). Therefore this period chosen to be as long as possible. A terminal server farm that is internally secured with this certificate must be renewed after 5 years at the latest or receive a new certificate.
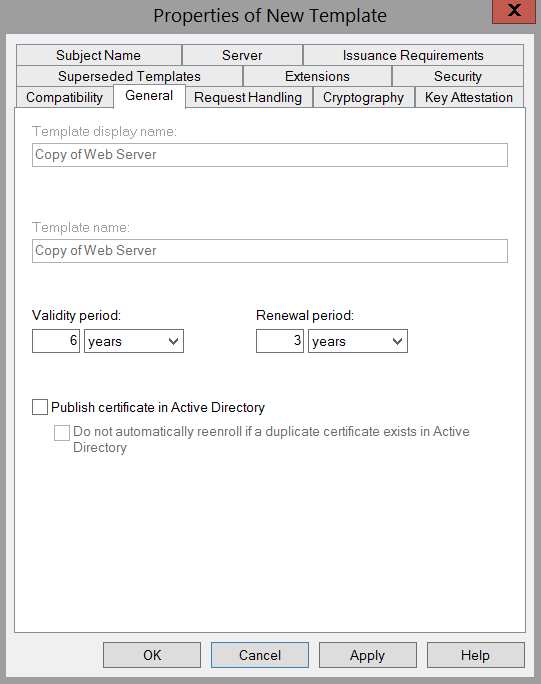
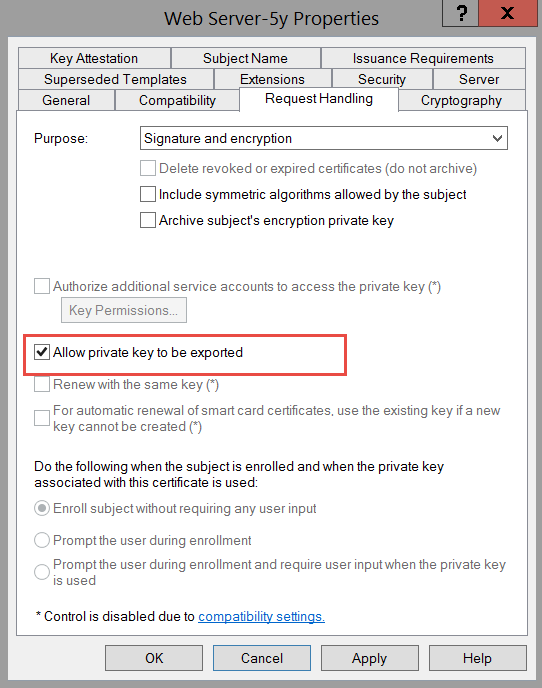
The template can be renamed via the “Change Name” function. In this example “Web Server-6y”. Upon a certificate request to a CA a private key is simultaneously generated for the certificate. This is linked with the requesting system and for security reasons cannot normally be exported. For certificates in another environment, for example for securing the communication between server farms, the private key is required. Therefore the possibility for an export must be configured in the template. This is possible in the options under “Request Handling” and “Allow Private Key to Be Exported”.
Inserting the new template into usable model templates
The new template is not immediately available, but rather needs to be allowed in the Certificate Authority MMC. To do so start an MMC and insert the snap-in “Certification Authority”. Under “Certificate Templates” now insert the newly created template via the function “New; Certificate Template to Issue”. VERY IMPORTANT: Some adjustments to the CA are still necessary in order for it to provide certificates for 20 years. By giving the following command is the CA authorized to do so.
certutil -setreg ca\validityperiodunits 20
net stop certsvc
net start certsvc
PowerShell Script to import certificates
It's of course nice when the certificates can be automatically imported with PowerShell. We have been using the automation solution “Uranos” (https://sourceforge.net/projects/uranos/) for the automatic installation of XenApp 4.5 through XenDesktop 7.x environments for our customers for about 10 years. For this solution we've created the following script to import certificates. This script also automatically inserts the server certificate into the IIS. We use a universal certificate here (*.DOMAIN.LOCAL)
###########################################################
#
# Project  : "Uran" Unattended Remote Automation
# Author   : Andreas Nick 2015
# Function : Impert CERTIFICATES "CER" from the Store_Trust folder
#
# www.software-virtualisierung.de
# www.nick-it.de
#
###########################################################
$TrustFolder = "Z:\packages\Configurations\Certificates\Store_Trust"
$ComputerFolder = "Z:\packages\Configurations\Certificates\Store_Personal"
Function Import-Certificate {

    [cmdletbinding(

                   SupportsShouldProcess = $True

                   )]

    Param (
        [parameter(ValueFromPipeline = $True, ValueFromPipelineByPropertyName = $True)]
        [Alias('PSComputername', '__Server', 'IPAddress')]
        [string[]]$Computername = $env:COMPUTERNAME,
        [parameter(Mandatory = $True)]
        [string]$Certificate,
        [System.Security.Cryptography.X509Certificates.StoreName]$StoreName = 'My',
        [System.Security.Cryptography.X509Certificates.StoreLocation]$StoreLocation = 'LocalMachine'
    )

    Begin {

        $CertificateObject = New-Object  System.Security.Cryptography.X509Certificates.X509Certificate2

        $CertificateObject.Import($Certificate)

    }

    Process {

        ForEach ($Computer in $Computername) {

            Try {

                Write-Verbose  ("Connecting to {0}\{1}" -f "\\$($Computername)\$($StoreName)", $StoreLocation)

                $CertStore = New-Object System.Security.Cryptography.X509Certificates.X509Store -ArgumentList "\\$($Computername)\$($StoreName)", $StoreLocation

                $CertStore.Open('ReadWrite')

                If ($PSCmdlet.ShouldProcess("$($StoreName)\$($StoreLocation)", "Add  $Certificate")) {

                    $CertStore.Add($CertificateObject)

                }
            }
            Catch {

                Write-Warning  "$($Computer): $_"
            }
        }
    }
}
Write-Host "import Store $TrustFolder\"
foreach($Cert in (Get-ChildItem "$TrustFolder\*.cer" )){
    Write-Host "import $Cert"
    Import-Certificate -Certificate $Cert.FullName -StoreName Root -StoreLocation LocalMachine -Verbose
}
Write-Host "import Personal Wildcard"
certutil -f -importpfx -p "Uranos1234" "$ComputerFolder\UranLocal_Wildcard10y.pfx"
#Bind IIS
$cert = dir Cert:\LocalMachine\My | Where-Object { $_.subject -match 'CN=\*.uran.local' }
$strThumb = $cert.Thumbprint.ToString()
Write-Host "Trumbprint :" $strThumb
Write-Host "Bind on IIS, if installed"
$IIS = Get-service | Where-Object {$_.name -eq "W3SVC"}
if ($IIS) {
    Import-Module WebAdministration
    Push-Location IIS:\
    cd SslBindings
    New-webBinding -Name "Default Web Site" -IP "*" -Port 443 -Protocol https -HostHeader $("$ENV:COMPUTERNAME"+'.uran.local').toLower()
    get-item cert:\LocalMachine\MY\$strThumb | new-item 0.0.0.0!443
    Pop-Location
    Write-Host "Restart W3SVC"
    restart-Service W3SVC
}
Comments 1
Great article, thank you, helped me a lot. I was truggling with installing web enrollment services.