With Folder2MSP you can create MSI packages and MSP patches from directories in the simplest manner possible. There is no excuse anymore to complete such a task using a script. MSI and MSP are the standard for software distribution. Our tool Folder2MSP will enable you to take advantage of this. Read further for details about using the tool and where to download it.
First the legal information:
EXCLUSION FROM LIABILITY: USE OCCURS AT YOUR OWN RISK. NICK INFORMATIONS UND ANDREAS NICK ARE NOT LIABLE UNDER ANY CIRCUMSTANCES FOR DAMAGES TO HARDWARE OR TO SOFTWARE, LOST DATA OR OTHER DIRECT OR INDIRECT DAMAGES THAT RESULT AS A USE OF THIS SOFTWARE. Please test thoroughly any patches and MSI packages created with this tool. In the cases of long patch sequences, problems can occur. Solutions to this problem are described in the text below.
Introduction
MSI is the abbreviation for Microsoft Installer, and MSP for Microsoft Patch. Customers often require a way to distribute directories. Ideally one does this with a software distributor such as the Microsoft Configuration Manager, which makes it especially easy to distribute MSI packages. We've been looking for a simple way to create these packages and then to be able to patch them at any time with MSP patches. A further advantage of using the Windows Installers is the Repair function of the package. Previously delivered packages can partly be repaired by the user herself or himself. The tool presented here is driven by the software “Windows Installer XML”, or WiX for short. It is a toolkit for creating MSI and MSP packages with a special feature; to my knowledge only WiX can create actual binary differences for MSP files. These are particularly small (the Pyro engine), thereby making it possible to completely change the contents of a target directory with an MSP. The installation location is determined with MSI parameters.
Thus the workflow for the administrator are the following steps:
- Creation of an MSI package from a directory
- Distribution of the package
- Creation of an MSP package from the “old” directory and the new one. Distribution of the MSP package
- At some point the distribution of a “Supersede Patch”
The tool creates several MSI files; respectively one file per software version for binary comparison.
The original goal was to make the creation of an MSP with deleted folders and files decidedly easier. Some popular tolls for MSI/MSP creation require that the MSI table “RemoveFile Table” be directly edited. This tool omits that necessity, simplifying the process.
The tool always creates two MSI files; one for the “before” and one for the “after” state. When a patch series is to be created, the current version of the installation should always be entered into the “Source Folder” field, and the product code as well as the upgrade code taken from the old installation.
Additionally the tool can create “supersede” patches that contain previously created MSP patches. When a series or chain of MSP patches becomes too long, a patch can become inconsistent. A supersede patch repairs such an installation. The original directory of the first installation and the current directory are necessary for this.
Notice: The Pyro tool from the Windows Installer XML toolkit creates only minor patches. Therefore the product code in the patch series may not be changed.
System Requirements
The installation files are included in the program directory.
- 64 bit operating system
- Microsoft .NET Framework 4
- Powershell 3.0, Windows6.1-KB2506143-x64.msu
- WinSDKTools_x86.msi, for the creation of msimsp.exe patches
Creation of a New Project
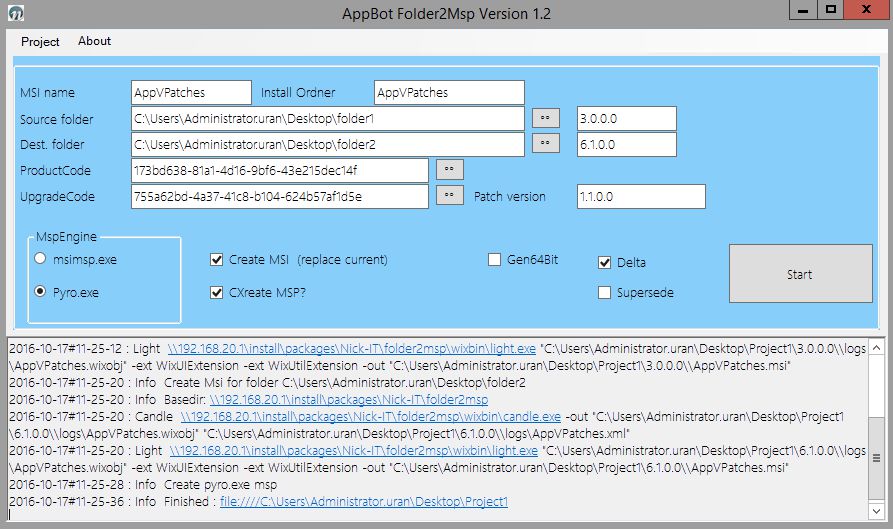
Upon starting the tool (Folders2Msp.exe) the first thing to do is to create a new project or to load an existing one. For our example, we'll create a new project (Project > New Project) and select the corresponding project folder.


The corresponding project file (Projectfile.xml) as well as the folder logs will be placed into the project folder.

After selection of a project folder, the GUI appears.
- MSI Name: The name of the MSI to be created, e.g. MYMSI
- Install Folder: The standard installation directory. After clicking on the MSI the installation would take place under C:\Program Files (x86)\INSTDIR. This can be adjusted after the fact with the MSI parameter TARGETDIR= .
- Version of the MSI for the first installation. Please use the format x.x.x.x! When the MSI is installed, this version number appears in the operating system under the “Programs and Features” in the column “Version”.
- Version of the MSI/MSP being patched to. When the MSI is installed, this version number appears in the operating system under the “Programs and Features” or by MSPs under “Installed Updates” in the column “Version”.
- Patch Version: This version number will be displayed in the operating system under “Installed Updates” directly in the patch name. It should be identical to the version of the MSI/MSP being patched to.
- Source Folder: Folder for the previous version.
- Destination Folder: Folder with the version being patched to.
- Product Code: may not be changed for subsequent patches in a patch sequence for a product. Otherwise a new product code can be generated by clicking on the “..” button.
- Upgrade Code: may not be changed for subsequent patches in a patch sequence for a product. Otherwise a new upgrade code can be generated by clicking on the “..” button.
- MspEngine: The tool used for patch creation. Msimsp.exe from the Windows SDK does not create differential patches. The tool must already be installed. Pyro.exe creates differential patches and is already contained in the tool's program directory.
- Create MSI: When an MSI already exists and only an MSP should be created, for example when changing the tool for MSP creation, then this option can be unchecked.
- Create MSP: When an MSP is not needed but an MSI is, then this option can remain unchecked.
- Gen64Bit: Installs the MSI to the “C:\Program Files” on a 64 bit system.
- Display with the output from the patch creation.
- Start: Starts the patch creation.
- Superseded: Creates comprehensive patches; for example original version 1.0, target version 1.5, patch version 1.5 – thereby replacing all previously created MSP files
Notice: When creating MSIs and MSPs the display hangs for some time, since external tools are being called via the command line. Simply wait for it to end. 200 MB of source files require approximately three minutes to work through for the Pyro Tool.
Under “Project > Settings”, global settings can be configured. The values for “Developer”, “Developer URL” and “Icon” appear later on the destination system under “Programs and Features”.

This information can be found after the installation in the install list. For testing we create a directory “Folder1” in which the App-V patches for Version 3 are located and a directory “Folder 2” in which the App-V patches for version 5 are located.

We thus create an MSI from Folder 1 and an MSP that should patch Folder 1 to the version of Folder 2.
Notice: These are only example files. The files are not appropriate for patching an App-V installation!
The version numbers don't play a large roll here. In the example, we go from version “3.0.0” to version “6.0.0”. The process is begun with “Start”. If the creation was successful, “Finished” and the path to the patch appears in the output window.

In addition to the project files and the “Logs” folder, two “version” folders are created, which contain the contents of the previously designated source and destination folders in the form of MSIs, as well as additional log files. The differential patch is created from both of these MSI files. This patch file as well as the log files for the creation process are located in the “patch” folder.

If the creation process was not successful, it is helpful to examine the corresponding log files for errors. The file “candle.log” is for the preprocessing, and the respective file “pyro.log” or “msi.log” is for the actual MSI/MSP creation. The log files for the MSI creation are located in the corresponding MSI “Version folder” under “logs”.
In the project directory there is now an MSI for version 3.0:

And a patch that can patch the directory to version 5.0.

After the installation of the MSI, it should look like this:


Following the installation of the MSP the directory changes as follows:
In the Control Panel under “Programs and Features” one sees the new version.

A patch “1.1.0” was installed.

Under C:\Program Files (x86)\AppVPatches there is a new version.

The process remains the same, for example for a patch 1.2.0 with “Folder 2” to “Folder 3”, and so on. If the patch series should become defective at some point, a Supersede Patch must be generated. Therefore it is essential to always retain every folder from which patches are generated.
Installation of a Patch
Silent Installation of patches:
msiexec.exe /I my.msi /qb
If you would like to determine the install path for a patch:
msiexec.exe /I my.msi APPLICATIONROOTDIRECTORY="C:\BSW“ /qb
Applying a patch:
msiexec /p mypatch_Pyro.msp REINSTALL=ALL REINSTALLMODE=vamus /qb
The patch can also be installed onto a system by double clicking. It is however recommended to install the patch with the parameter “REINSTALL=ALL REINSTALLMODE=vamus”, because otherwise some files may not be patched.
Despite using the parameter “REINSTALL=ALL REINSTALLMODE=vamus”, sometimes higher patches fail. In this case it is possible to install the patch using the parameter REINSTALL=DEP.
msiexec /p BSW-pp_1.5.0.0_Pyro.msp REINSTALL=DEP REINSTALLMODE=vamus /qb
The disadvantage here is that the patch is irreparable since the MSI databank becomes inconsistent. Therefor the patch remains small. This problem can be solved with a correction patch that contains all previous patches (see the documentation for BSW Patchbuilder).
Should a patch be installed using the parameter REINSTALL=DEP, it is advisable to install the previous patch once more with the parameter “REINSTALL=ALL REINSTALLMODE=vamus” in order to ensure that the files to be patched are available in the correct version.
In order to be sure that all files have been correctly patched, one could use the tool “TreeCompare”. This tool makes possible a binary comparison of two folders.
http://www.freeware-guide.com/OldGoodFreeware/Freezerware/treecompare.html

Notice: One should never roll out a patch that wasn't first thoroughly tested on a test system. TreeCompare recommends itself towards that end.
Repair Installation
Patches cannot be uninstalled after distribution. However the current version can be repaired. For the repair function, all MSPs and the MSI must remain on the system.
A repair installation of MSI packages is possible by clicking on “Repair” under “Programs and Features” or by running the MSI again. MSP files can only be repaired by installing the package again.
If a patch is defective or contains errors, it is possible at any time to release a correction patch.

Parameters
The following is an overview of all the parameters that are available for Folder2MSP. Using them it is possible to fully automate patch creation.
=====================================================================================
       AppBot - Folder2MSP :: Creation of differential patches on an MSP base
       Author: Andreas Nick 2015
=====================================================================================


Syntax         :: AppBotFolder2MSP.exe -ProjectFolder <> -SourceFolder <>
                  -DestFolder <> -autostart -autoexit [...]

All Parameters:
===============

-ProjectFolder :: mandatory value- a folder is automatically created if it doesn't already 					exist

-SourceFolder  :: folder with the previous version

-SourceVersion :: version number of the source in format x.x.x.x (default=1.0.0.0)

-DestFolder    :: folder with the latest version

-DestVersion   :: latest version number in format x.x.x.x (default=1.1.0.0)

-ProductCode   :: GUID in a Pyro patch family must always be the same
                  For MSIMSP packages the code may be changed
                  Automatically generated if no code is entered

-UpgradeCode   :: GUID with the upgrade code. This must always be the same for a patch family
                  Automatically generated if no code is entered

-PatchVersion  :: version number of the patch (default=DestVersion)

-InstallDir    :: Default installation directory <MyCompany\MySoftware>
                  Or simply just  (default=INSTDIR)

-Msiname       :: file name of the MSI and MSP file

-autostart     :: automatic start of the MSI creation

-autoexit      :: ends the application automatically

-x64           :: setup creates a 64 bit MSI

-ignorerrors   :: ignores all errors

-OnlyBaseMSI   :: creates only the base MSI without patches

-OnlyMSP       :: creates only the MSP file without an MSI

                  The MSI files of the versions must be available!

-Delta         :: yes/no, default is yes (will not be saved)

-Supersede     :: yes/no, default is no (will not be saved)
=====================================================================================
An Example with PowerShell:
$Commandline = '"-projectFolder" "c:\temp\js1_prj" "-SourceFolder" "C:\temp\js1\admin" "-DestFolder" "C:\temp\js1\site" "-destVersion" "2.0.0.0" "-UpgradeCode" "c6e7f141-8d32-4f7d-ae56-a4ae51c16a09" "-autoexit" "-autostart"'
& .\Folders2Msp.exe $Commandline
Download:
 Folders2MSP
Folders2MSP Version 1.2.1
